Sunday, April 27, 2008
Saturday, April 26, 2008
Change Explorer Background Image
This a simple manipulation of regestry for changing explorer background image.
1. Create your own image in photoshop with you own size. I prefer 785x86 pixel and save with .bmp for example back.bmp.

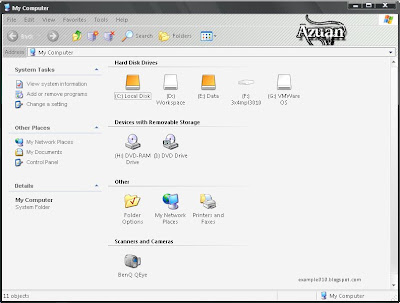
This is my example.
2. Then open registry editor: Start > Run > Regedit.exe
3. Open HKEY_CURRENT_USER/Software/Microsoft/Internet Explorer/Toolbar.
4. Add new string by right click and named it BackBitmapShell.
5. Double click the key and enter the full path of your bitmap image. Click OK.
6. Close registry editor and open my computer. Walla!.

1. Create your own image in photoshop with you own size. I prefer 785x86 pixel and save with .bmp for example back.bmp.

This is my example.
2. Then open registry editor: Start > Run > Regedit.exe
3. Open HKEY_CURRENT_USER/Software/Microsoft/Internet Explorer/Toolbar.
4. Add new string by right click and named it BackBitmapShell.
5. Double click the key and enter the full path of your bitmap image. Click OK.
6. Close registry editor and open my computer. Walla!.

Labels:
tutorials
Wednesday, April 23, 2008
Bad day
Today, i'm surfing websites. Suddenly appear a message that told me, updates for my free AVG antispyware were completed. I thought it was same as everytime i'm update, but today is different. After the message, i heard a sound and i realize that my profile are fully deleted. There are no more Quick Luanch toolbar, no shorcut in my desktop, and no profile for my Mozilla Firefox. Very bad day because i really forget to save my profile and my restore was turned off. That a big lesson for me to always update my profile.
Labels:
my life
Sunday, April 20, 2008
How to insert things in context menu
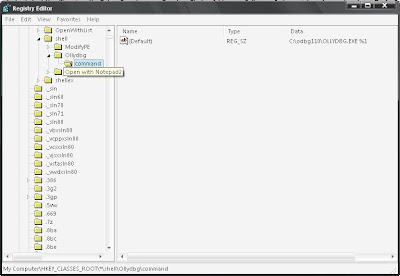
 Open your Registry Editor by start>run and type regedit.. then, go to HKEY_CLASSES_ROOT\*\Shell\ .
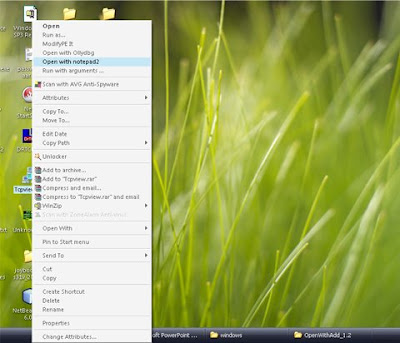
Create a new key by right clicking it. And rename it for whatever you want for example notepad. On the right hand side, double click the default and put on the value, what you want it to appear, example "open with notepad".
And then create new key under the previous key and name it command. Change tha default value to the link to your file for eg: C:\WINDOWS\System32\Notepad.exe and dont forget to add %1 at the end to ensure this is appear only on the supported file only. So it becomes C:\WINDOWS\System32\Notepad.exe %1.
And then create new key under the previous key and name it command. Change tha default value to the link to your file for eg: C:\WINDOWS\System32\Notepad.exe and dont forget to add %1 at the end to ensure this is appear only on the supported file only. So it becomes C:\WINDOWS\System32\Notepad.exe %1.

Labels:
tutorials
Easy way to rename recycle bin
Many people having problems to rename their recycle bin to whatever name they want it to be. So I provide a simple tutorial on how to do it..
Open up your text editor or notepad and copy the following text into a new file:
Windows Registry Editor Version 5.00
[HKEY_CLASSES_ROOT\CLSID\{645FF040-5081-101B-9F08-00AA002F954E}\ShellFolder]
"Attributes"=hex:50,01,00,20
"CallForAttributes"=dword:00000000
and now this file as whatever name you want but must end with .reg, eg: rename bin.reg.. save the file and double click the saved file and press yes if prompted a message box. Then, you can rename the recycle bin by right click>rename or directly press F2 when highlight the recycle bin..
Labels:
tutorials
Change Background of the folder
As Windows XP Home/Pro was released, many have realized that Microsoft had removed our ability to change wallpaper of our folders! Shortly after we realized the trouble on our machines, we got to work on a solution. We’ve found that Microsoft™ did not remove the ability to change the background and text color but instead hide the interface.
Now, it is somewhat simple for anyone to add wallpaper to a Windows XP folder.
1) Open notepad
2) Type in the text below
[{BE0981 40-A513-11D0-A3 A4-00C04FD706EC}]
IconArea_Image ="C:\your picture location.jpg"
IconArea_Text= 0x00FFFFFF
3) Save file as desktop.ini
Save as type : All Files
4) Copy the desktop.ini file you just created, and
paste into the folder you want the background to
be change
5) Go to START --> RUN..
6) Type Attrib s "C:\Location of your folder"
Click OK
7) Open your folder and the picture should be set by now.
Labels:
tutorials
Tuesday, April 1, 2008
Subscribe to:
Comments (Atom)


